|

|
|
You will first need to
download the picture of the camera.
It is zipped to preserve psp format
Get it here
|
|
Open a New Image in PSP
400x400 Transparent Background
Open the polaroidcamera.psp image
Copy and paste as New Selection into the 400x400 blank image file
Place in the upper left hand corner
Deselect by clicking on the Selections Menu - Select None
Open your Layer Palette
Highlight Layer 1 on the Layer Palette, Right Click and Duplicate
We will use the duplicate layer to add the flash
|
|
I personally don't rename my layers
but if it helps you can right click on each layer after creating and give it a
name
i.e. Layer one you could name Camera_No Flash
The copy of layer 1 you could rename to Camera_Flash
You can always put your curser over the layer and you will see a mini picture of what is
on that layer if you need to remember what is on each layer
To make this tutorial easier, I will rename the layers
|
|
Put an X on the eyeglasses in Camera_No Flash Layer to hide it for
now
Highlight the Camera_Flash Layer
then go to the Effects Menu - Illumination - Sunburst
The color should be White
Drag the crossbar on the left picture to the area of the flash on the camera
Use the same settings as shown on the Sunburst screenshot below
except the Horizontal and Vertical Lightspot
These numbers will change according to the placement
of the crossbar in the left picture above
|
|

|
|
Click on the eyeglasses of the Camera_Flash Layer
to hide and click on the red X on Camera_No Flash to
unhide
You should now only see the camera without the flash
Go to the Layers menu and create a new Vector Layer
Change your foreground color to a medium gray and your background color to
white
|
|
Click on the Preset Shapes tool and choose the Rectangle
Draw a square
Keeping the deformation tool active, drag the box up to the camera
Size the width to the width of the slot in the camera where the picture comes
out
Size the height to look like its starting to come out of the camera. (Very Short)
Use the rotate tool to move the box to the correct angle to make it look like it slides
out
Once you have it placed correctly
then click the Arrow Tool to unselect the deformation tool
Right click and rename Film_1 and click on the eyeglass hide this layer
|
|

|
|
Create a new vector layer
Click the preset shapes tool make another rectangle
Size the length of this rectangle just a little bit longer than the first one
so it looks like more of the picture has come out of the camera.
Once you have it positioned correctly
rename layer to Film 2 and click the eye glasses to hide this layer
|
|

|
|
Create another New Vector Layer and do the same
Only make the length of this one to look like its totally out of the camera
Rename layer to Film 3 and hide layer
|
|

|
|
You need to create one more New Vector Layer and one more
rectangle
This will be the final picture
Size it large enough to hold your picture remembering that a
Polaroid picture has a large bottom border
Place this rectangle below and to the right of the camera
You will want want to leave the Camera_No Flash Layer unhidden
so you can place your full picture where it won't overlap
but yet be close enough to your camera image
Using the Preset Shapes tool create a square
inside your picture frame leaving larger border at the bottom
use the arrow tool to deselect
Rename this layer Picture
Convert this layer to a Raster Layer
(Right click on the layer and convert to raster)
Click on the magic wand tool and click inside the
square of the picture to select in inner box
Go to the Selections Menu - Modify - Expand - 2 pixels
This is so that you won't see the gray outline on the picture
Go back to selections and Save to Alpha Channel
|
|

|
|
Duplicate this layer twice (right click on the layer - duplicate)
and rename Picture Blur 1 and Picture Blur 2
Highlight Picture Blur 1 Layer and hide all other layers except Camera_No
Flash
|
|
Open the first picture you would like to use
Crop if needed and then resize the image
You will still have your camera image on the desktop so
you will have to judge by eye, the resizing
Try to get it as close as possible to the size of the inner square on your picture
frame
Later we will copy into the selection and the closer the size
is the less distortion there will be
|
|
Here's a hint:
After I created the selection to place my picture and saved to Alpha Channel
I cut and pasted as a new image
Then I looked at the Image Information and noted the exact dimensions
Now I know the exact size I need for my picture images and
tried to crop and size my pictures to those dimensions
|
|
Once you have your image sized
Then duplicate your image 3 times (Shift D) and close the original image
|
|
We will use 1 of these as a grayscale blur and
one as a color blur and one for the actual picture
On one of the images, click the Effects tool - Blur - Gaussian Blur
Play with the settings so that you see a blur of your picture
You want it to look like its starting to develop, just like a Polaroid does
Click on Colors and Grayscale
Click one another sized picture and Effects - Blur - Gaussian Blur
This time keep the colors don't change to gray
scale
|
|

|
|
Highlight Picture Blue 1 Layer
Go to Selections Menu and Load from Alpha Channel
You should now see the marching ants on the inside square of your picture
Click on your Gaussian blurred gray picture image
Copy and then paste INTO SELECTION on the Picture Blur 1 Layer
of your Camera Image.
|
|
Click on your Gaussian blurred color picture image
Copy and then paste INTO SELECTION on the Picture Blur 2 Layer
of your Camera Image
|
|
Now go to the Layer Palette and Highlight the Picture Layer
Duplicate this layer for each picture you want to add
Rename Picture1, Picture2, Picture3, Picture4, etc
|
|
You already used your first picture to make the gaussian blur images
So use that picture first
|
|
If you haven't done so already
open any other pictures you want to add and crop and resize as needed
|
|
With the Picture1 Layer highlighted
Go to Selections - Load from Alpha Channel
Then copy your sized picture and paste INTO SELECTION
|

|
|
Do the same for each picture you wish to use
Highlight Picture2, etc - Go to selections. Load from Alpha Channel
Copy and Paste INTO SELECTION. Do this for each Picture Layer
You can add as many picture layers as you would like
|
|
You now have all the layers needed
If you want to crop any extra space do it now
Save this file as Polaroid.psp
This way you will have a backup psp file with all the layers in tack
You can always reuse this file and change the pictures
|
|
Now we need to make each file for the animation to take to animation shop
We now need to hide the layers we don't want and merge visible layers
CAUTION:
You must hide the layers you don't want and you must have a visible layer highlighted
or you will only get the MERGE ALL(FLATTEN) option and you want to MERGE
VISIBLE
|
|
First we want just the camera. So hide all layers except Camera_No Flash
Layer
Then make sure your curser is highlighting the active layer
Merge Visible
Save As: Polaroid1 and save in psp format
Undo your merge layers
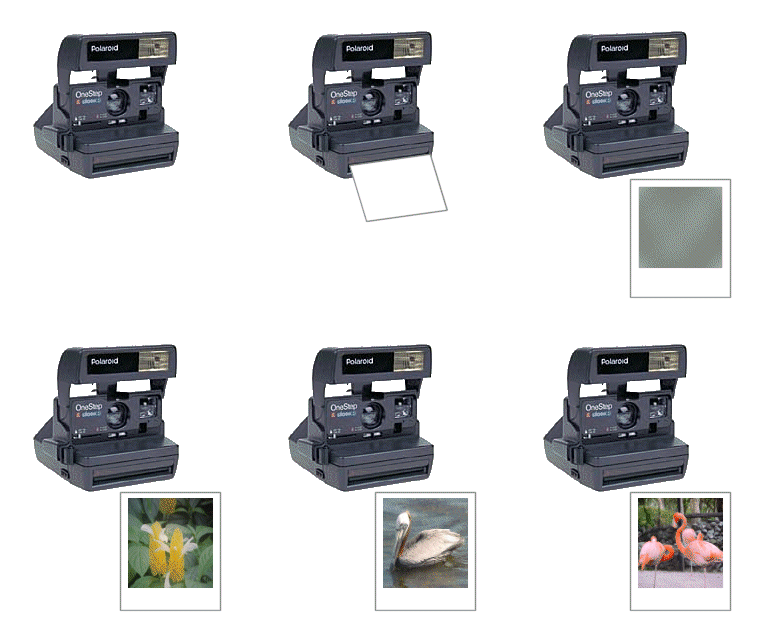
Then we want to show the camera flash and the first part of the picture coming
out
So we need to hide all layers except Camera_Flash and Film 1 Layers
Again merge visible.
Save as: Polaroid2.psp
Undo Merge layers
Now we want to show the picture coming out a little more and the camera without the
flash
so we need to hide all layers except Camera_No Flash and Film 2
Layer
Merge Visible
Save as: Polaroid3.psp
Undo Merge layers
Now we want to show the picture almost out of the camera
So we want to hide all layers except Camera_No Flash and Film 3 Layers
Merge Visable
Save as: Polaroid4.psp
Undo Merge layers
Now we want to show the picture totally outside of the camera, but beginning to
develop
So we want to hide all layers except Camera_No Flash and Picture Blur 1
Layers
Merge Visible
Save as: Polaroid5.psp
Undo Merge layers
Now we want to show the picture with developing color
So we need to hide all layers except Camera_No Flash and Picture Blur 2
Layers
Merge visible
Save as: Polaroid6.psp
Undo Merge Layers
Now we want to show the pictures!
* Hide all layers except Camera_No Flash and Picture 1 Layer
Merge Visible.
Save as: Polaroid7.psp
* do this last step for each picture changing the layer to Picture 2, 3, etc.
and saving the name as Polaroid8,9,etc.
|
|
Open Animation Shop
Set the Canvas backround as Transparent
add images Polaroid1 through polaroid7 (or how many you have)
I set the frame display to 25.
And then change the setting to 75 on the picture frames
So the picture will stay on the screen longer to view
In the animation frames view, click on the colored Blur Frame and Effect - Insert Image
Transition
You want to choose Fade Effect
Set the transition to contain a total of 2 - 4 frames depending on how much
fade you want
|
|
Save your animation
You are done!!!!!
Animations must be saved as a gif file, therefore you do lose some clarity
of your pictures
Pictures used in the animation are taken with my Sony Mavica Digital
Camera
© Seira55 - Night Owl - Terry
|


