|
1. Extracting your Glitter Gif File to Separate Frames |
|
- |
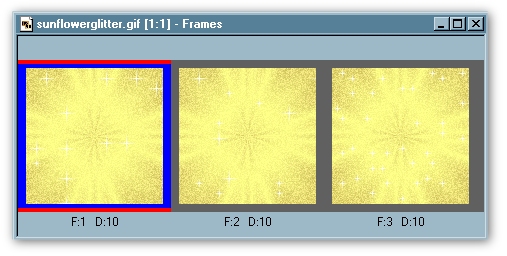
A glitter file is an animation. Animations are always in GIF
Format. Animations contain frames of individual pictures. Most glitter
files have 3 frames, but some have more. For this tutorial we will
talk about a Glitter File consisting of 3 frames. |
|
|
- |
To be able to use glitter files you will need to export each of the
frames to Paint Shop Pro so that you will have 3 separate images. (1 image from each frame in the glitter gif file).
|
|
|
|
|
| 2.
Open
the Glitter File in Animation Shop |
|
- |
Open
the Glitter File in Animation Shop.
After your glitter file is open you will need to select all
frames.
Edit Menu – Select All (Ctrl A). |
|
|
- |
Right
Click on any one of the frames in the glitter file. |
|
|
- |
A popup window
will display a list of options.
Choose Export Frames to Paint Shop Pro (Shift X). |
|
|
 |
|
| 3.
This
will automatically open Paint Shop Pro
|
|
- |
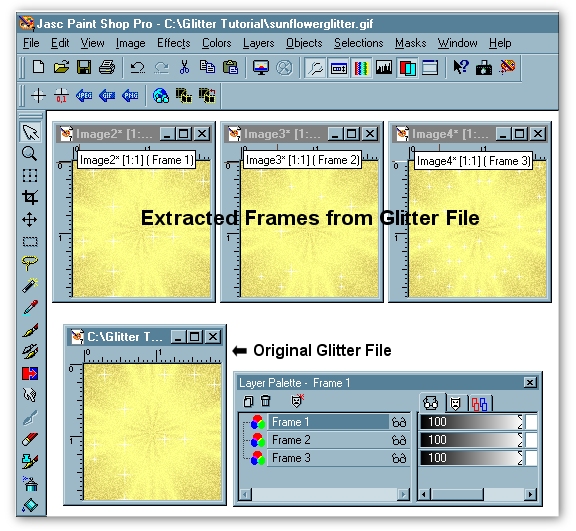
Make
sure your Layer Palette window is open. |
|
|
- |
With
your glitter image highlighted, you
will see 3 Frames. Click on each frame
and drag to an empty area of the workspace |
|
|
- |
Once
you have dragged a frame you will need to highlight the original
glitter again to choose another frame to drag. Drag all 3 frames
to your workspace |
|
|
- |
You
will now see 3 additional images – each image is a frame of the
glitter file. You can hover
your curser over the file name and it will show you the frame
number |
|
|
- |
You
can now close original glitter file and minimize each glitter
frame image |
|
|
|
 |
|
| 4.
Selecting
Areas of your image to Glitter |
|
- |
Open
the Image you wish to glitter
|
|
|
1. |
Use the
Magic Wand to Select an area of your image.
You may have to play with the tolerance settings to get
all of the area you wish to select. If you hold the Shift
Key down you can add another area to your selection. Once you have
the areas selected that you want to glitter, Save to Alpha
Channel |
|
|
|
-
- |
Selections – Save to
Alpha Channel
Selections – Select None
|
|
|
|
 |
|
|
2. |
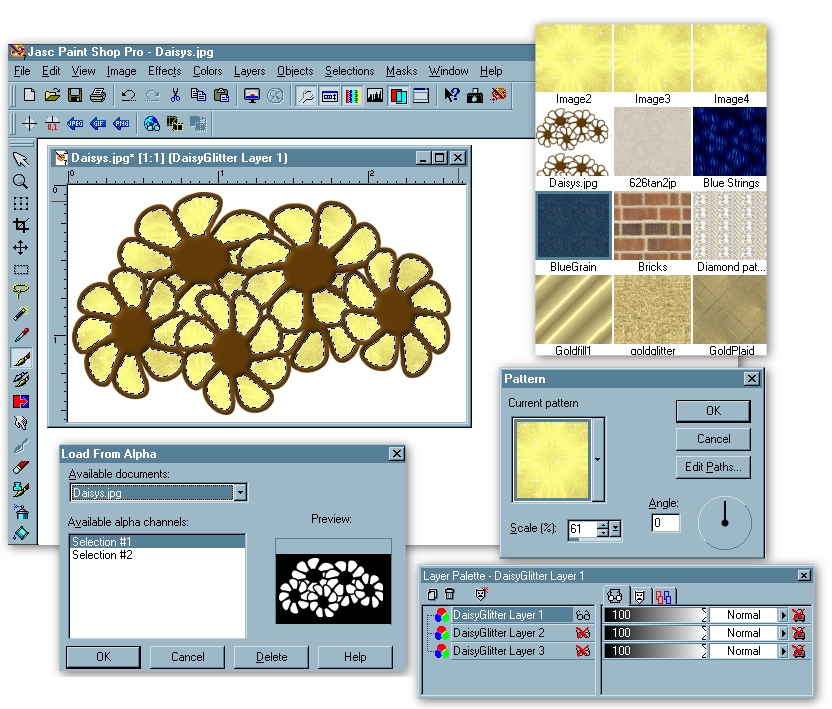
Now if
you want to glitter more areas with another glitter file you can
create a separate alpha channel. In the example I have created
the 2nd Alpha Channel by creating selections using
the Lasso tool. The Lasso tool is good for selections that you
are unable to create using the Magic Wand. I decided to make my
own freehand selections of the Daisy centers |
|
|
|
-
-
-
- |
Using the Lasso Tool
–
Freehand Style –
Feather 0 –
Antialias Checked |
|
|
|
I then
drew a jagged circle in the inner part of the daisy centers.
Save selection to Alpha Channel |
|
|
|
-
- |
Selections – Save to
Alpha Channel
Selections – Select None |
|
|
|
You can
create as many selections to save to alpha channels as you like |
|
|
|
 |
|
| 5.
You now
have all your selections saved to alpha channels and are ready to start
glittering your selections |
|
- |
With you layer Palette
open, right click on your image (background) |
|
|
- |
Promote your
background to a Layer |
|
|
- |
Duplicate the Layer 2
times. You should now have 3 layers. If your Glitter file has more
than 3 frames, make sure you duplicate the layer to create the
same amount of layers as your Glitter File has frames |
|
|
- |
To make it easier you
can rename your layers Layer 1, Layer 2, Layer 3, etc. |
|
|
- |
Load the Alpha Channel
you wish to glitter. |
|
|
- |
Selections – Load
from Alpha Channel. You will see the marching ants around your
selection |
|
|
- |
Open Patterns in the
Style Box. You will see the 3 glitter frame images that you have
minimized. Choose the first image to set it as your current |
|
|
- |
Starting with
Layer
1 you can either Flood Fill or paint
with your 1st Glitter Frame |
|
|
- |
Once you have it
filled, X out the Layer |
|
|
- |
Open Patterns in the
Style Box and choose the 2nd Glitter Frame to set it as
your current pattern |
|
|
- |
Highlight
Layer 2
on your image and flood fill or paint with your 2nd
Glitter Frame |
|
|
- |
Once you have it
filled X out the Layer |
|
|
- |
Open Patterns in the
Style Box and choose the 3rd Glitter Frame to set as
your current pattern |
|
|
- |
Highlight
Layer 3
on your image and flood fill or paint with your 3rd
Glitter Frame |
|
|
- |
The reason we are
places X's on each layer is so
that you can temporarily hide the layer, which will let you
actually see the selection being filled
on your next layer |
|
|
- |
To glitter another
area – Open another alpha Channel and follow the same
instructions above
|
|
|
|
 |
|
|
|
 |
|
|
- |
When
you have applied all the glittered areas. Make sure you take all
the X’s off the layers so
they are all active.
Save the File in PSP FORMAT. By saving in psp format you
will retain the layers that will create the animation. |
|
