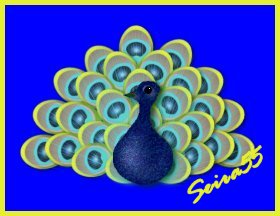
|
You will first need
to download the Peacock Feather and the Peacock Body tubes.
These tubes were made using PSP 7
Click
Here to download zipfile containing tubes. Unzip to your PSP tubes
folder
Open New Image – I used 600x600 with Blue
Background.
View at Normal Viewing 1:1.
This will give you enough room to work with and the overall size will be
cropped later.
Create a new raster
layer. Highlight the new Layer and Click on the Tube Tool.
Choose the Peacock Feather SM tube. It doesn’t matter where you
place the tube,
since we will be moving and rotating it on each layer.
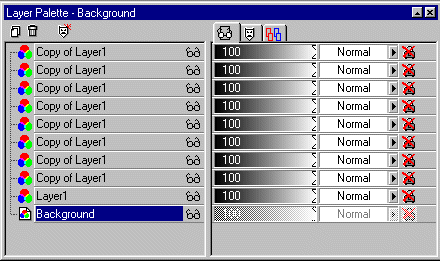
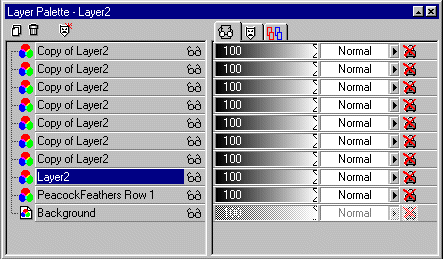
With the layer
palette open and layer 1 highlighted, duplicate this layer (Layer 1) 8
times.
We are not going to rename these layers since we will be merging them
later.
To
open the Layer Pallet. Click View – Toolbars – Click on the Layer
Pallet.
|
|
|
|
Highlight Layer 1 to make it active. Click on the eyeglasses on each
copy of layer one.
You will now have a red X. By hiding the other layers it will be easier
to see what you are working on. Using the deformation tool move the
feather to the center of your workspace.
Click the White Arrow on your tool bar to unselect the deformation tool.
Click on the magic wand tool , then click anywhere on the blue
background to select the feather.
Then go to Selections and Invert.
Go back to Selections and Modify – Contract 2 pixels. Go to Effects
– 3D Effects-Drop Shadow.
I used Offset – Vertical 3 – Horizontal 5. Attributes Opacity 50
Blur 10. Color is Black.
Go to Selections and click None.
You do not have to use the drop shadow effect, but it gives the picture
more depth.
Click
on the red X to unhide the next layer and highlight to activate the next
Feather Layer
and using the deformation tool, move the Peacock Feather on this layer
to the left of the first feather
on Layer 1. Then rotate to turn outward to form the fan look to the
first row of feathers.
Deselect the deformation tool and repeat the selection & drop shadow
process –
(Click the magic wand tool to select the feather. Then go to Selection
and Invert.
Go back to Selection and Modify – Contract 2 pixels. Go to Effects –
3D Effects-Drop Shadow.
I used Offset – Vertical 3 – Horizontal 5. Attributes Opacity 50
Blur 10. Color is Black – Selections None)
Do
this for each feather layer.
Alternating placing the feather tube on each side of the middle tube.
If you do not like your placement of the feathers, you can go back
to each layer
and move using the deformation tool.
Try to make a nice arch using the feathers.
Later we will be merging these layers so make sure you have them placed
where you want them, before you merge.
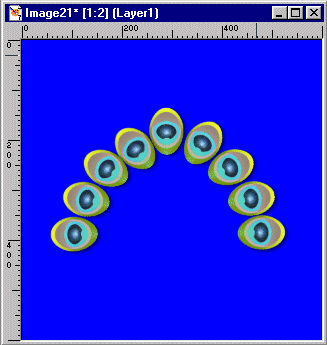
This
is what your picture should look like :
|
|
|
|
On the Layer Palette Click on the eyeglasses of the Background Layer to
make this layer NOT visible.
This is important, because we will now merge all the visible layers.
|
|
Go to
Layers – Merge – Visible
Rename
the Merged Layer – Peacock Feathers Row 1
Click back on the Background Layer to make visible again
Now
would be a good time to save your work.
Save in psp format and name your file. I named mine Colorful Peacock.
For the
2nd row of feathers -
Make 7 new layers making following the instructions as the first row.
Place each feather below the first row and use the deformation tool to
move and rotate.
Your
picture should now look something like this
|
|
|
|
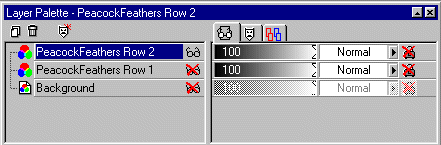
After you are sure of your placement, you can merge the 2nd
row of feather layers.
Make the background and the FeatherRow1
Layer NOT visible by clicking on the eyeglasses of those layers
Layers
– Merge Visible.
Make sure you are highlighted on one of the visible layers, otherwise
you will only be allowed to Merge All and you want to just Merge
Visible. Rename PeacockFeatherRow2.
Then make all 3 layers visible again to continue working.
|
|
|
|
|
|
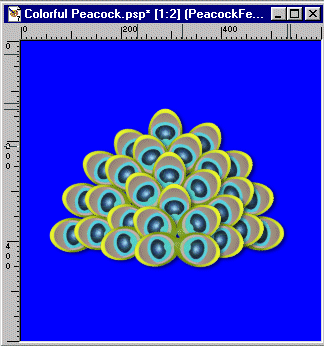
Continue to create new layers for each row until the feather portion is
full of feathers.
Should only take 4 rows. Place your feathers so they look natural,
place them at different angles and row heights. Merge each row after
completed.
Don’t forgot to hide the background and previous merged rows each time
and only merge visible the layers of the row you have just finished.
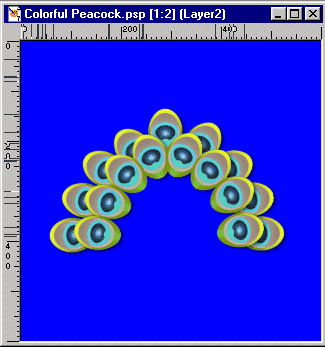
This is
how your feathers will look when all rows are completed
|
|
|
|
|
|
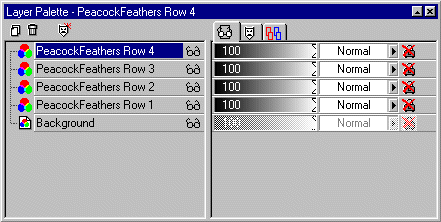
Now you can Merge all the Peacock Feather Layers.
Make sure again the background layer is NOT visible.
Highlight one of the Visible Layers and go to Layers – Merge –
Visible.
Rename the merged layer, Peacock Feathers.
You should now have only 2 layers. The Background Layer and the Peacock
Feathers Layer.
|
|
Highlight
the Peacock Feather layer. Go to Effects – Illumination Effects –
Sunburst.
Use
the following Settings. Or experiment on your own.
In the left window you will see a white crossbar.
Move this bar to the lower middle of the feathers.
By moving this crossbar with your mouse,
the Light Spot Horizontal and Vertical settings will change according to
your position.
You can set the Rays – Density and Brightness Light spot brightness to
my settings, but let the Light Spot
Horizontal and Vertical settings change with your crossbar.
Experiment with the color for the rays. I chose the aqua blue from the
feather, but you may find another color that you like better
|
|

|
Create a New Layer and add the Peacock Body Tube
Use
the deformation tool to place in the correct location and size if needed
Merge the background layer and the Peacock Body Layer.
Crop
your image to cut off any excess background.
I like to add borders to make the edges look finished.
Use the color picker to pick a color from your image.
I liked the yellow, but you can use any color you want.
Go
to Image – Add Borders. If it asks to Merge the image say Yes.
Make sure there is a check mark on Symmetric and choose a border width.
I
chose 6, but you can experiment.
If you don’t like the border size, just edit undo and choose another
size or color.
File – Save as –
Name your file and save as .jpg |
|